How to Fix a Broken Tote
(Return
to georgesbasement)
A plane arrived yesterday with a newly (and cleanly) broken tote as well as a couple of cracks in the sole that could only be seen with a microscope (!) . I took it upon myself to fix the tote before returning the plane, because the seller was already going to feel pretty bad about the whole affair.
So I applied a procedure that I've been working on for a while, which goes as follows:
1. Inspect the surfaces of the break. Was the tote broken before, and is there glue all over the fracture surfaces ? If so, scrape off the glue, using a three-cornered scraper. I made mine from an old triangular file by grinding (lengthwise) the last 3/4 inch or so, leaving three sharp, curved edges. Be sure to get down to sound wood, but be careful to apply the scraper uniformly so as to maintain a good fit between the mating surfaces. Make sure the halves of the break fit together without rocking; you must perform this vital test now, before applying the glue !
2. Using a paper towel soaked in acetone, rub the surfaces of the break until you no longer pick up stains on the towel from the wood. This is especially important with oily or resinous woods like rosewood (Stanley totes) or the "East Indian" mahogany used by Sargent.
3. About a minute before the next step, soak the surfaces of the break with water, but blot up the excess. The water activates the polyurethane glue that you will be using very soon.
4. Apply polyurethane glue to both surfaces, taking care not to get it all over your fingers. There are dire warnings about dermatitis on the package, by the way; and it really sticks to one's fingers.
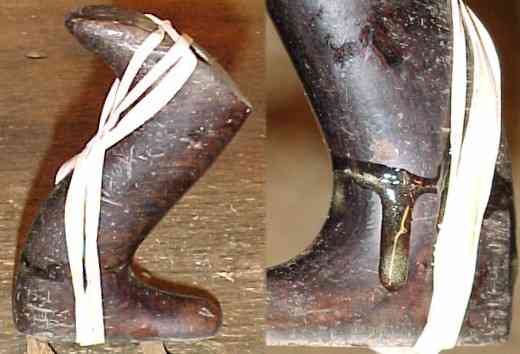
5. Fit the two halves together and then clamp with rubber bands (gum bands; elastics; rubbers, depending on locale). I use the type that seem to come from an infinite resource at the USPS. The rubber bands permit you to apply the clamping pressure as closely as possible to perpendicular to the glue joint. If the clamping applies any shear load to the joint, it may slip maddeningly, as the polyurethane glue is rather slippery at first. I apply two rubber bands, each one in a figure-eight pattern when the tote is broken near the bottom, and I double-up each band as shown here:
6. Make no attempt to clean off the excess glue; it will expand & foam as it goes about curing, and the excess will run out of the joint after you have retired for the night anyway. It does not stick very well to the tote's external finish, so it will be easier to remove after it has set.
7. After the glue has set overnight, carefully carve off the excess glue with a sharp knife or a single-edge razor blade. Be sure you do not cut into the tote (or your fingers, as the blood will stain the glue line). Then use a scraper with a turned edge (in the manner of a veneer scraper, but without any holder - I made a one inch square scraper from a piece of W1 tool steel) to remove the last of the excess glue and to blend the edges of the repair. The more care you took in Step (5) the less work you will have at this critical blending stage. Then go over the entire tote with 0000 steel wool.
8. If there are any gaps showing after Step (7), use five-minute epoxy to fill them. If you are very patient and can ignore the ringing telephone or the calls of Nature for the next fifteen minutes, you can do the entire perimeter of the repair with the epoxy at one go by applying the mixed epoxy to the joint with a toothpick and then manipulating the tote in your hands so you can prevent the epoxy from running or sagging until it has set. It helps to be sitting in your shop, far from SWMBO's carpet or your best trousers/dress, while performing this step, as the first couple of times you may drop the epoxied tote into your lap. Thanks are due a fellow Galoot, Tom Thornton, for suggesting this use of epoxy. Repeat the scraping & steel wool steps after the epoxy has hardened, generally overnight.
9. Once you are certain that no more filling or more chunks of wood need to be added, use tung oil to restore the scratches & bare spots in the finish that "happened" during the preceding steps. Do not store the oily rags or paper towels anywhere where the heat generated by the polymerizing tung oil can accumulate; it's a fire hazard. I unfold my tung-oil-soaked paper towels and lay them on the concrete floor until the oil has cured.
10. Sit back and admire the result:
 No, this is
not a cure for baldness. These pictures were taken after fixing the tote,
not before breaking it. In case you are wondering, the glue line passes
just below that prominent dot in the center of the highlight in the left
photograph, about one-third of the way up from the bottom. In the right
photograph, the glue line runs upwards from left to right and passes through
the center of the image.
No, this is
not a cure for baldness. These pictures were taken after fixing the tote,
not before breaking it. In case you are wondering, the glue line passes
just below that prominent dot in the center of the highlight in the left
photograph, about one-third of the way up from the bottom. In the right
photograph, the glue line runs upwards from left to right and passes through
the center of the image.
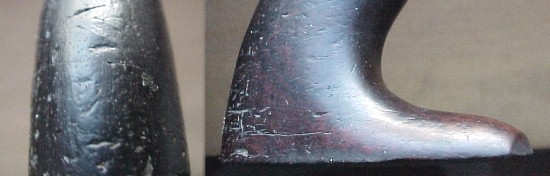 OK; OK. Here's
some pix where you can actually see the glue line.
OK; OK. Here's
some pix where you can actually see the glue line.